
Using Online Whiteboards in Meetings for Beginners

You’ve taken workshops, watched countless YouTube videos, and joined every Slack channel you can get your thumbs on, but when it comes to facilitating with online tools, you still feel unprepared.
Confidence comes with experience. If you’re new to facilitating with online tools, be prepared to feel unprepared.
While you wait for that magic moment of confidence to kick in, here are a few tips to help you “fake it ‘til you make it” with online collaboration tools.
Choosing the right tool
Before you start designing your whiteboard, make sure it’s the right tool for your meeting and participants. Online whiteboards are great collaboration tools, but they take time to feel comfortable with, both as a facilitator and as a participant. Start with your design and participants in mind.
Ask yourself:
Will my participants be in the right mindset to learn something new?
Do my participants need to contribute thoughts or ideas during the meeting?
Do I have fewer than 50 participants?
Do I have a second facilitator to support me?
If the answer to any of these questions is “no” or “not sure,” consider using a different tool, like Google Docs. Google Docs can accomplish a lot. It has a low barrier to entry, is very reliable, and the final product is easy to read and already transcribed in report format. Plus, you can still make it pretty by changing the layout and background color and adding images and icons.
But, if the answers are “yes” (or if you’re just feeling brave) and you’re deciding which online whiteboard to use, consider the tools already used by the organization or team. Commonly used programs like Zoom, Teams, and Canva all offer their own twists on a whiteboard. When participants are already familiar with the basic interface of a program, it can help make transitioning into a whiteboard easier.
If the team you’re working with is technically savvy or open to new tools, Mural and Miro are the industry leaders of dedicated online whiteboard tools. Mural is easy to use with simple, ready-to-go templates, so it’s great for first-time whiteboard users and has more features for facilitation. Miro can be less intuitive, but it has many app integrations and an even larger library of templates. We use both, but Mural tends to be our favorite.
Design better meetings, in person or online
If you are using an online whiteboard for the first time, start planning for your meeting like you would any other:
Identify the meeting outcomes. For help identifying outcomes, check out Prepping for a Meeting from the This Meeting Sucks podcast.
Design an outline of your session. We love SessionLab. It helps us quickly lay out our designs and modify the times and durations of activities.
Build a “run of show.” Add only the details you need to know how you will flow from one activity to another. Later in this article, we will offer a few voice tracks for your run of show.
New to leading meetings? Get clear about what meeting skills are and how to use them. The Just-in-Time Meeting Skills Playbook breaks down all the essentials you need to facilitate a successful meeting.
Now that we have our outcomes, outline, and run of show, create a materials list. If we were meeting in person, that list might include:
Sticky notes
Markers
Flipcharts
Dot stickers
Flipcharts with key questions on them
Agenda slide or flipchart
Ground rules slide or flipchart
Parking lot slide or flipchart
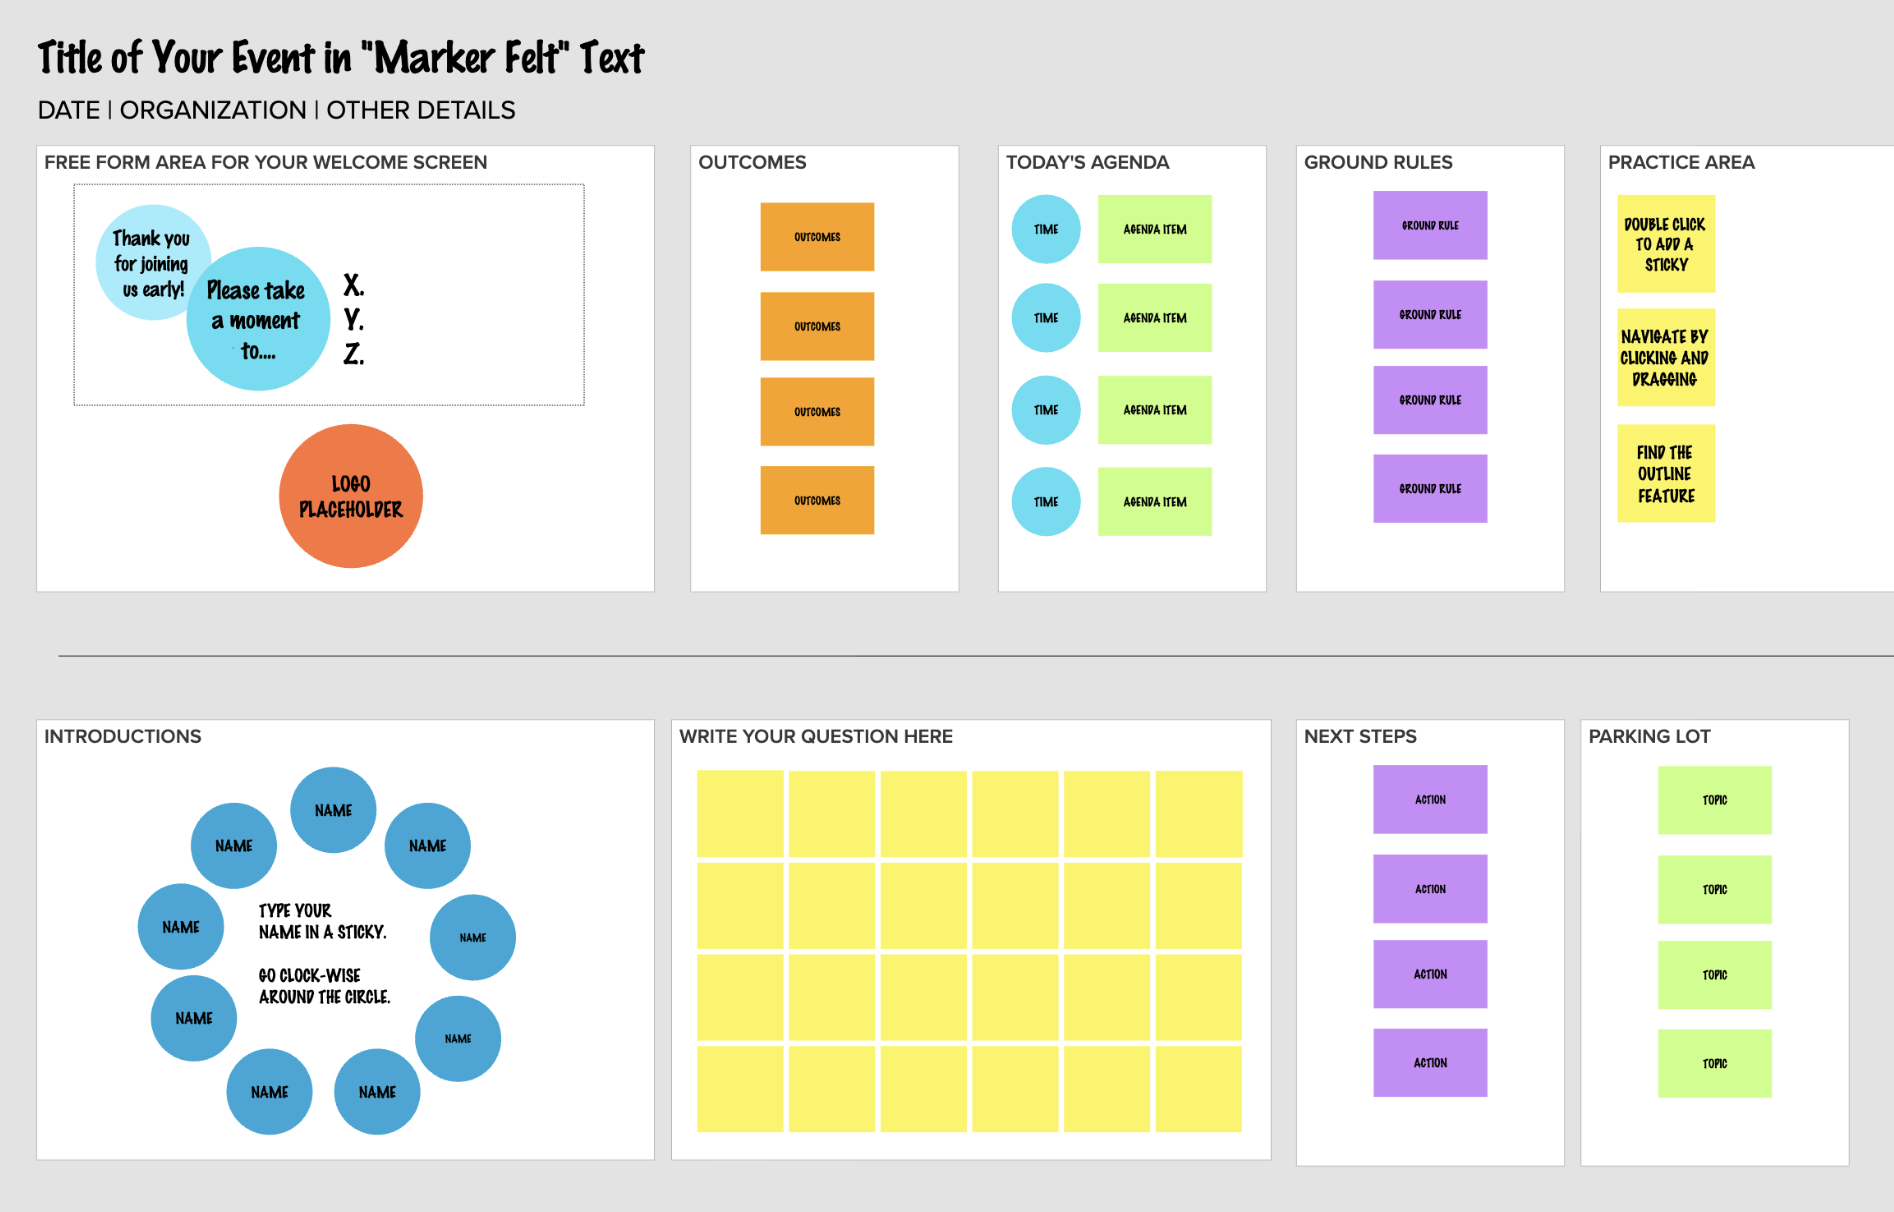
For each item you listed in your materials, consider how you might do that online. Anything you would have a slide or flipchart for needs its own dedicated space on the whiteboard.
Since we want you to have a leg up, here is a Mural board template you can use to experiment. Don’t forget to “lock” elements that you don’t want participants to be able to move around.
Remember that we tend to read left to right and top to bottom. Arrange each part of your board using this logic so that you and the participants can easily navigate.
Introducing participants to a new tool
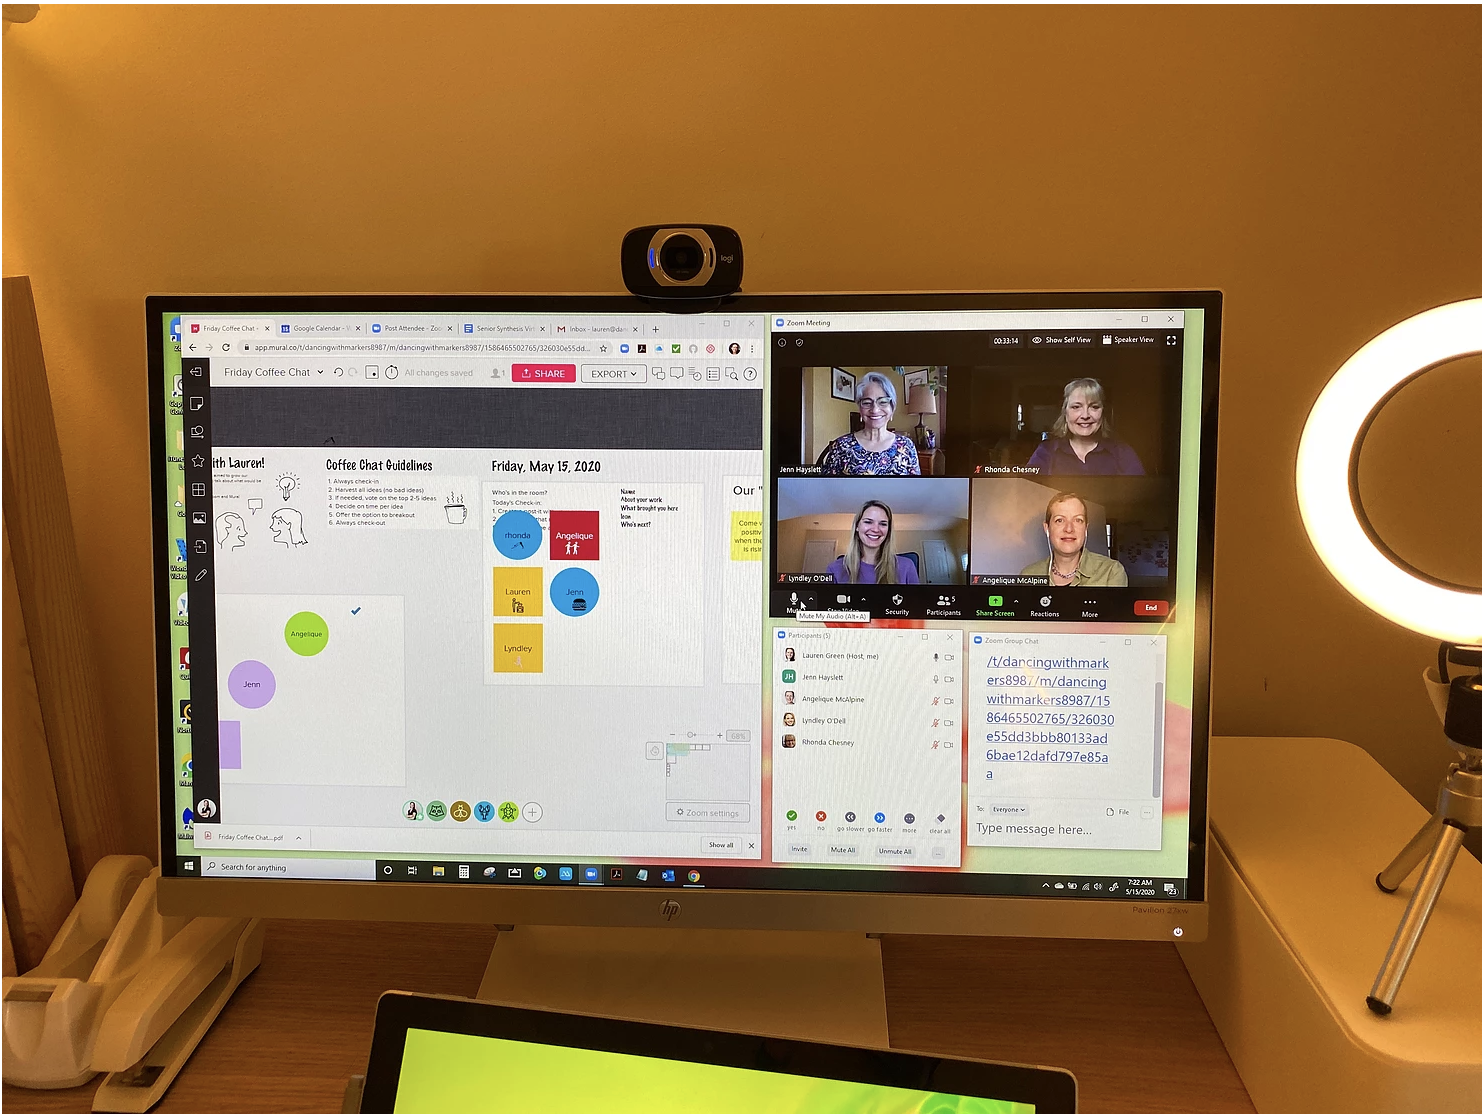
Transitions are everything. Most online meetings begin on a web conferencing platform (i.e., Zoom), perhaps with a shared screen of a slide that includes a welcome message. Later, there is a transition to the tool where the participants will collaborate, and there may be more transitions throughout the session when participants need to go back to Zoom to type something into the chat or view a shared screen.
These transitions are the biggest opportunity for participants to get lost. You can prepare participants to manage transitions by doing a few things before and a few things during the session.
Before the session
Send a communication that will help participants prepare for their experience. Here is an email template that allows us to quickly craft easy-to-understand guidance.
Once your participants are prepared, there are likely to be fewer issues as you transition through the session. A well-choreographed transition in advance of the meeting will make entering into a new online space easier for participants and help them focus on the task at hand.
During the session
Start by teaching participants a bit of “Monitor Feng Shui.” In other words, they need to ‘split their screen’ to see their browser on one side and the web conferencing tool on the other. This enables participants to have “face time” while collaborating in the secondary tool. Use the links below as a reference:
Next, share your screen and demo the tool. Each tool is different, but in general, we teach two basic skills for every tool: how to navigate and add content.
When introducing Mural or another whiteboard, we show:
How to navigate using your mouse and/or the transparent mini-map.
How to add a sticky note (double click), add text, and move it around.
If we have a larger whiteboard, we may also show how to navigate and use the Outline mode.
If we’re working in a Google Doc, we show:
How to navigate using the Outline view and/or clicking on the Facilitator's image/icon.
To press “Enter/Return” a few times in order to add content to a table, without typing over each other.
We like to provide participants with a “Sandbox area” where they can practice these skills before using them during the session. At this time, we might also offer guidance about what to do if the tool slows down. Generally, a “refresh” of the browser will work wonders.
For the applause-worthy transition, use this script:
“Now that I’ve demonstrated a few of the skills you need, we’re going to get you in here to practice. In a moment, I will stop my screen share and [I/TECH HOST] will put a link into the Chat. Please click that link and join me in [TOOL]. Once you are here, please navigate to the Sandbox, and practice the skills you just learned. Again, the skills to practice are [X, Y and Z], and if you forget they are written in [LOCATION].”
Then, slow down. If you’re using Mural, start “summoning” participants to the Sandbox as quickly as you see them join. If you have a tech host, they might take on this task. Watch and wait for people to get lost. Some people will begin working on the Sandbox tasks, giving you and/or your tech host the chance to help those who have challenges.
For a tech-savvy group, this transition might take only a couple of minutes. For a less tech-savvy group, this transition might take 10 or even 15 minutes. Give yourself time and say a few times, “Please type in the Chat or go off mute, and let us know if you are having any challenges or if anything I said was unclear.”
When it is time to move on to the activity, ask your tech host to work one-on-one with anyone who may still be having challenges.
Quick fixes in Mural
Browser issues: Chrome typically works best.
Lag: Click refresh.
Using a phone or iPad: Ask participants to use their computer.
Getting prompted to “Login”: Be sure you tell participants to click “Enter as a Visitor” when prompted, and if it still doesn’t work, ask the participant to close their browser and click the link again.
Entering on the wrong part of the board: Use “Summon” or “Ask to be Followed.” You can also use the Outline feature to send them a direct link to the board section they should be looking at.
If all else fails, this is why you have a tech host (or hosts). Ask your tech host to accommodate the challenged participant by typing their comments for them. And if they go into a breakout room, ask another participant to share their screen and type for the participant. It’s not worth letting technology distract from the conversation. If at least one person is able to use the tool, that’s enough for the group.
Cue participants where to look
When too much is happening on stage, the audience doesn’t know where to look. Good virtual facilitators incorporate cues into their voice track to help participants direct their focus.
For example:
“I’m going to talk about _______, and I need you to look at _______.”
“John is going to speak to us about _______, and you don’t need to look at anything except the video.”
“I’m going to demonstrate how to do _______, and I need you to watch my video for a moment. Be sure that you are in speaker view for this.”
“When we get to the next section, you will need to find _______.”
The blanks above may include a task, a slide, a part of a MURAL board, a page in a Google Document, or a specific person’s video feed.
Confidence comes with experience
You won’t feel truly comfortable working in a new tool until you’ve had time to play, make mistakes, and learn.
Choose a low-stakes meeting to practice with. This can even be a family phone call, or something you volunteer for. Tell the person or group that you’d like to use this as an opportunity to practice a virtual tool or process that is new for you. Use the guidance from this article to help you design a process and choose a tool to support the conversation.
Do a dry run. Offer a free or low-cost version of the process you’re planning in another trusted space, such as an online community of practice. Consider offering a version of the workshop you are planning to members of your favorite Meetup or Facebook group. Be sure to modify the content to meet their needs.
Have a disaster rehearsal. This is a concept I learned from my high-school theatre teacher, Mr.Smith. Before every show, we had one dress rehearsal where Mr.Smith would purposefully try to do as many things as he could to interrupt the show and allow us to figure out how to work together and continue the show despite limitations and distractions. For example, he would ask the lighting crew to turn off the lights or ask the props crew to “lose” a prop, creating a valuable learning experience and also a ton of fun.
Practice how you would handle the following “disaster scenarios:”
Internet lag
Audio malfunction
Slide malfunction
Platform update
Participants messing up the template
Participant unable to access the link
Remember, “The show must go on!”